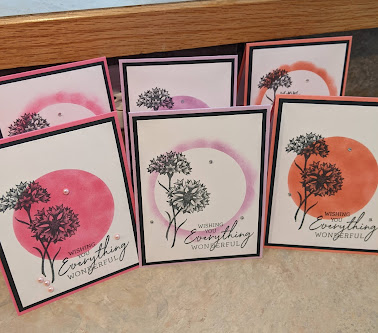
Posts

Divided Tulips

Image
  I saw this card template on Mystery Monday Stamping . I liked the idea, but switched out a stamped image using SU Timeless Tulips for the DSP. I used Polished Pink and Mint Macaron for my ink and paper choices. I needed a good Mother's Day card and I think it turned out perfect!

Black Floral Stripe card

Image
 I got the inspiration for this card from a YouTube video by Sue Stampfield. It is a great way to use up scraps and the black makes the floral image pop! 1. Cut black cardstock to 11 x 4 1/4. Score at 5 1/2. 2. Cut black cardstock to 4 x 5 1/4 and emboss. Attach to the front of the card. 3. Cut DSP to 1 1/2 x 4. 4. Cut coordinating cardstock to 1 3/4 x 4. Attach the DSP and then use dimensionals to attach to the card front. 5. Using scraps, stamp the sentiment, punch it out and attach to coordinating cardstock. 6. Cut out white or vanilla cardstock for the inside of the card, 4 x 5 1/4. Stamp as desired and attach. 7. Embellish as desired.

Crayon Birthday Fun Fold

Image
 I wanted to use up some random envelopes with this card. So I measured the envelope, subtracted a quarter inch from each side, and that is the size of the face of the card.  This fun fold opens only in the middle, so I made the middle one half the size of the card face and each strip of patterned paper one quarter of the card face (minus one fourth inch to give the border). The patterned paper is just random paper from my stash.  I cut white cardstock for the inside middle and the outside middle.  The front piece of white I embossed with SU birthday greetings embossing folder.  Then I stamped the crayon from School Days from CTMH and cut them out. I adhered them with dimensionals.  The red gems are from the dollar store.  Easy but fun!

Circle Masking Technique

Image
 I had a lot of fun with this new technique! I saw this on Sharon's Mystery Stamping and knew I needed to try it. It was actually quite easy, and I think it creates some stunning cards! 1. Cut colored cardstock to 4 1/4 x 11. Score at 5 1/2. 2. Cut black cardstock to 4 x 5 1/4. 3. Cut white cardstock to 3 3/4 x 5. 4. Cut white cardstock to 4 x 5 1/4 (for the inside). 5. Die cut or punch a large circle out of a post it note or piece of printer paper. I think using the sticky note would be ideal because then it will stick in place while you are working with it! 6. Center the paper with the circle cut out of it (negative image) on the 3 3/4 x 5 cardstock. Using a sponge, daubers, or other sponge-type applicator, gently fill in the circle with ink that matches your colored cardstock.  7. Using black ink, stamp a solid color image and sentiment on the card.  8. Add embellishments as desired. 9. Stamp a sentiment on the inside white piece and attach to the inside of the card.

Wedding Cake Card

Image
  For this card, I used the CTMH set Now and Forever. I made the card mainly white, with added texture from the SU Quatrefoil Tile embossing folder. I did color in a few flowers and greenery on the cake to give it a little visual interest, and also added Touch of Stella to the sashes on the cake. I matted the image with a narrow black mat, and then used some silver cardstock I had in my stash for a wider mat. I added ribbon to the bottom to give it a finished look.

Hello Ladybug Fun Fold

Image
 For this card, I used the Hello Ladybug stamp set and punch from Stampin' Up! I used this blog post as a template for this card. For papers, I used Real Red as the card base, Basic Black for layering, DSP from the Daffodil Daydream pack, and Very Vanilla cardstock. For the green, I used Mossy Meadow. All Stampin' Up! products. The red gems were a dollar store find!

Thanks Oodles

Image
I have a friend who is a former CTMH consultant who gave me tons of stamp sets she had collected over the years. I am enjoying experimenting with them and creating some fun cards!  This was a simple card made using the Oodles of Doodles Flair stamp set from CTMH. I used Watermelon, Tropical Blue, and Sunny Yellow (all CTMH, and quite old, so they probably aren't out there any more.) I also used white twine to add visual interest in the plain white side. I don't know why I don't love having lots of blank space. I liked how this turned out, having the white space but also having some texture with the twine.